好的, 事出有因, 源自我看到滿多人都開始使用github寫Blog, 我也開始有這個想法
但因為手頭上的作業系統是win7, 想順手來試試看, 但卻遭遇了不少困難
最後花了不少時間終於把Octopress弄到我的Github上面, 在此記錄了一下我的安裝經驗
下載基本需要安裝的套件
RubyInstaller for Win7 64 bits
檔案位於 RubyInstaller 分類, 有一個Ruby 2.2.3 (x64), 點它下載
Ruby DEVELOPMENT KITfor Win7 64 bits
檔案位於 DEVELOPMENT KIT 分類, 選擇 For use with Ruby 2.0 and above (x64 - 64bits only)
-
我在這邊選擇的Python是ActiveState公司出品的Free Version, 這個版本包含很多好用的Python Plugin
開始安裝套件
基本上, 安裝git client沒有什麼難度, 但有一些細節要注意, 例如你想直接用ssh和GitHub連線, 那就要作一些設定, 我將安裝git ssh的設定寫在另外一篇, 請參考 (巴拉巴拉)
安裝完git之後, 開啟cmd,輸入git --version, 應該會有版本號碼出現
接著安裝RubuyInstaller, 點選安裝檔案, 然後一直按Next Next..Install就可以裝完了, 要記得勾選 Add Ruby excutables to your PATH, 如下圖
 請全部都勾選吧
安裝完成之後, 開啟你的cmd, 輸入 ruby --version, 看看有沒有什麼東西印出來
如果出現類似command not found.. 請關閉cmd再重新開啟一個(讓cmd重新讀取環境變數)
若在沒有, 那就是你一定沒有在安裝的時候勾選設定PATH.
除此之外, 安裝Ruby的過程不會出現什麼奇怪的現象了, 如果有, 請在下方留言 (但現在沒有留言版給你留言… :P)
若要進一步看Ruby是否設定進去環境變數,
在cmd中輸入set, 看是否有出現這一行
PATHEXT=.COM;.EXE;.BAT;.CMD;.VBS;.VBE;.JS;.JSE;.WSF;.WSH;.MSC;.PY;.RB;.RBW
上面最後有出現.RB, .RBW, 那就是了 (不知道你是否懷疑Ruby沒有設定進PATH, 但卻可以執行?)
我想PATHEXT就是解答之一
安裝完成之後, 接下來一定要緊接著安裝RUBY DEVELOPMENT KIT (超!重!要!)
RUBY DEV KIT是一個自我解壓縮包, 請解壓縮到C:\RubyDevKit
然後執行
C:\RubyDevKit>ruby dk.rb init
    [INFO] found RubyInstaller v2.2.3 at C:/Ruby22-x64
    Initialization complete! Please review and modify the auto-generated
    'config.yml' file to ensure it contains the root directories to all
    of the installed Rubies you want enhanced by the DevKit.
C:\RubyDevKit>ruby dk.rb install
    [INFO] Updating convenience notice gem override for 'C:/Ruby22-x64'
    [INFO] Installing 'C:/Ruby22-x64/lib/ruby/site_ruby/devkit.rb'
基本上應該要沒什麼問題, 有問題請到Ruby DEVELOPMENT Github 尋求專業解答
好的, 安裝完RubyDevKit之後, 最後把Python裝一裝, 這個沒什麼難度, 要注意就是勾選把Python加入環境變數Path
以上就是基本套件安裝
開始著手進行Octopress的安裝
接下來, 在你想要安裝的目錄下面, 開啟CMD
這邊要切記, 要使用Administrator開啟CMD
執行以下指令, 例如我是在D:\kenny_blog
D:\kenny_blog>git clone git://github.com/imathis/octopress.git octopress
注意, 我們要從octopress這個github clone下來到我們的一個新的目錄叫做 octopress
接下來, cd進去octopress的目錄
D:\kenny_blog>cd octopress
D:\kenny_blog\octopress>gem install bundler
D:\kenny_blog\octopress>bundle install
D:\kenny_blog\octopress>rake install
底下是我的詳細的執行過程
D:\kenny_blog\octopress>gem install bundler
    Fetching: bundler-1.10.6.gem (100%)
    Successfully installed bundler-1.10.6
    Parsing documentation for bundler-1.10.6
    Installing ri documentation for bundler-1.10.6
    Done installing documentation for bundler after 4 seconds
    1 gem installed

D:\kenny_blog\octopress>bundle install
    Fetching gem metadata from https://rubygems.org/...........
    Fetching version metadata from https://rubygems.org/...
    Fetching dependency metadata from https://rubygems.org/..
    Resolving dependencies...
    Using rake 10.4.2
    Installing RedCloth 4.2.9 with native extensions
    Installing blankslate 2.1.2.4
    Installing chunky_png 1.3.5
    Installing fast-stemmer 1.0.2 with native extensions
    Installing classifier-reborn 2.0.4
    Installing coffee-script-source 1.9.1.1
    Installing execjs 2.6.0
    Installing coffee-script 2.4.1
    Installing colorator 0.1
    Installing multi_json 1.11.2
    Installing sass 3.4.19
    Installing compass-core 1.0.3
    Installing compass-import-once 1.0.5
    Installing rb-fsevent 0.9.6
    Installing ffi 1.9.10
    Installing rb-inotify 0.9.5
    Installing compass 1.0.3
    Installing tilt 2.0.1
    Installing haml 4.0.7
    Installing jekyll-coffeescript 1.0.1
    Installing jekyll-gist 1.3.5
    Installing jekyll-paginate 1.1.0
    Installing jekyll-sass-converter 1.3.0
    Installing listen 3.0.4
    Installing jekyll-watch 1.3.0
    Installing kramdown 1.9.0
    Installing liquid 2.6.3
    Installing mercenary 0.3.5
    Installing posix-spawn 0.3.11 with native extensions
    Installing yajl-ruby 1.2.1 with native extensions
    Installing pygments.rb 0.6.3
    Installing redcarpet 3.3.3 with native extensions
    Installing safe_yaml 1.0.4
    Installing parslet 1.5.0
    Installing toml 0.1.2
    Installing jekyll 2.5.3
    Installing jekyll-sitemap 0.9.0
    Installing octopress-hooks 2.6.1
    Installing octopress-date-format 2.0.2
    Installing rack 1.6.4
    Installing rack-protection 1.5.3
    Installing rdiscount 2.1.8 with native extensions
    Installing sass-globbing 1.0.0
    Installing sinatra 1.4.6
    Installing stringex 1.4.0
    Using bundler 1.10.6
    Bundle complete! 13 Gemfile dependencies, 47 gems now installed.
    Use `bundle show [gemname]` to see where a bundled gem is installed.
    Post-install message from compass:
        Compass is charityware. If you love it, please donate on our behalf at http:
    //umdf.org/compass Thanks!
    Post-install message from haml:

    HEADS UP! Haml 4.0 has many improvements, but also has changes that may break
    your application:

    * Support for Ruby 1.8.6 dropped
    * Support for Rails 2 dropped
    * Sass filter now always outputs <style> tags
    * Data attributes are now hyphenated, not underscored
    * html2haml utility moved to the html2haml gem
    * Textile and Maruku filters moved to the haml-contrib gem

    For more info see:

    http://rubydoc.info/github/haml/haml/file/CHANGELOG.md

D:\kenny_blog\octopress>rake install
    //cmd will open new window to run below
    ## Copying classic theme into ./source and ./sass
    mkdir -p source
    cp -r .themes/classic/source/. source
    mkdir -p sass
    cp -r .themes/classic/sass/. sass
    mkdir -p source/_posts
    mkdir -p public
OK, 大功告成, 若沒有順利到這邊
底下列出幾個你會在bundle install遇到的問題
若你沒有先安裝RubyDevKit, 就執行
bundle install, 你應該會遇到底下的問題Bundler::GemspecError: Could not read gem at C:/Ruby22-x64/lib/ruby/gems/2.2.0/c ache/RedCloth-4.2.9.gem. It may be corrupted. An error occurred while installing RedCloth (4.2.9), and Bundler cannot continue. Make sure that `gem install RedCloth -v '4.2.9'` succeeds before bundling.****請記得回去安裝RubyDevKit
若你安裝了RubyDevKit還是遇到相同的問題, 請記得清空Cache, 因為上述的錯誤提示你說Could not read gem at…, 請到
C:/Ruby22-x64/lib/ruby/gems/2.2.0/cache底下, 把看到的東西全部都刪除, 這個時候再重新執行就可以了. 我在這邊卡超久 (=‵′=)
申請Github的網址空間
以上都Run完成之後, 我們要先回到github上面,來創造一個我們要用來存放網誌的容器(repository)
在此之前, 我先說明一下網誌的網址, 使用octopress在github上建立網誌(Blog)的時候, github會默認我們的網誌的網址(address)為 YourName.github.io
舉例來說, 我在github上面的帳號是kennytu, 那麼我的Blog的URL網址就是 kennytu.github.io
OK, 回到github上, 我們執行以下步驟
- 在Github上Create一個容器,名為YourName.github.com, for example: kennytu.github.com
- 點一下SSH clone URL, 把SSH URL記錄起來, 晚一點要讓octopress使用
上述的第2步驟, 是要在第1步驟創建完成之後, 再點選進去你新的容器, 就會在右下方看到SSH clone URL的小按鈕
以上, 就完成了github的容器創建, 其實滿容易的, 剩餘的就是多K一下git的基本知識. git的進階用法太多了, 是要努力學習一下
將Octopress的一些範本資料, 同步到我們剛剛申請的github容器裡
一樣在剛剛的目錄, 我們先輸入底下指令
D:\kenny_blog\octopress>rake setup_github_pages
此時CMD會跳出要我們輸入github的repository, 我們就把剛剛從SSH clone URL複製的URL貼過來
在這邊的範例就是 git@github.com:kennytu/kennytu.github.com.git
完成之後, octopress就會開始執行一些初始化作業, 接著執行
D:\kenny_blog\octopress>rake generate
D:\kenny_blog\octopress>rake deploy
基本上, 到這邊為止, 我們已經完成了大部份的設定了.
作完deply之後, 我們可以到github的網頁, 去看看我們剛剛創建的repository, 在這邊是kennytu.github.io
會看到如下的畫面
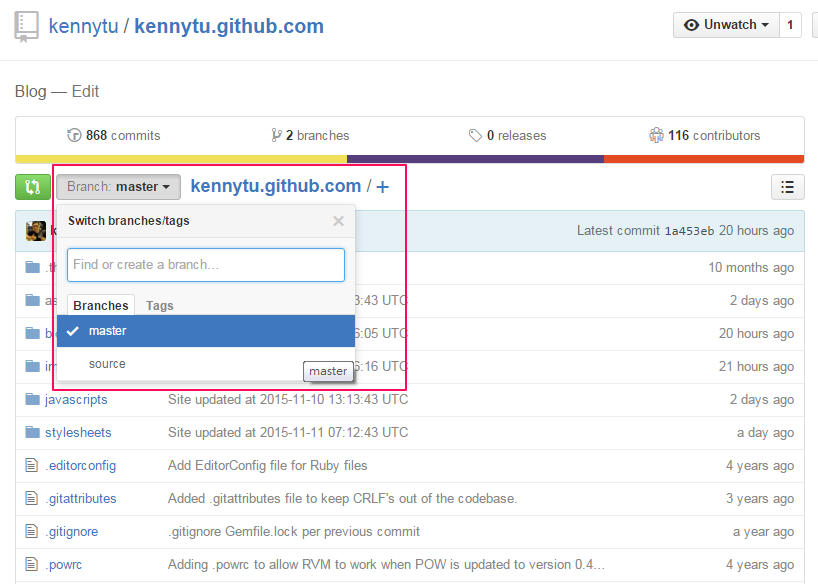
我們發現到在這個repo(repository的縮寫)底下有兩個branch:
一個是source
另一個是master
這兩的branch在底下要稍微介紹一下
Octopress對於branch的管理
在這一節的開始, 我來說明一下octopress目錄下的git branch
請在安裝路徑, 我這邊的話就是D:\kenny_blog, 輸入以下指令
D:\kenny_blog\octopress>git branch
* source

D:\kenny_blog\\octopress>cd _deploy

D:\kenny_blog\octopress\_deploy>git branch
* master
當我們使用octopress撰寫Blog的時候, 我們是對source的這個branch作修改, octopress基本上不會對這個source brunch作任何動作, 也就是說, 我們要自己使用git來維護這個source (當然,剛開始是octopress幫我們創建這個source branch的)
在寫完網誌(用我滿喜歡的Markdown語法)之後, 我們使用rake generate來產生靜態網頁, 這時候octopress會將靜態網頁放在_deploy這個目錄下, 而這個目錄是branch master的範圍, 接著, 當我們使用rake deploy,將_deploy底下的所有檔案佈署到遠端repo的時候,它是佈署到origin master這個branch去的(octopress會自動用git幫我們佈署). 最後, 我們的github.io的Blog, 是以master這個branch,作為網站資料的來源來顯示
ok, 所以說, source資料夾裡面所更改的任何code, 我們都要自己透過底下指令
git add .
git commit .
git push origin source
PS. commit的時候可以用 git commit . -m "message" (跳過開啟應用程式要寫comment的步驟)
當我們在source資料夾, 使用git push origin source的時候, 並不會將底下的_deploy的資料夾一起push上去,這是因為octopres有幫我們做了一些設定, 以區別master和source的更改
OK, 講到這邊, 希望有個基本的理解了
接下來要介紹如何寫文章
創建新的文章, Preview以及Deploy
在source的branch下, 執行
rake new_post['文章標題']
例如, D:\kenny_blog\octopress>\rake new_post[‘my_initial_page’]
此時octopress會在source的目錄下創建一個2015-11-11-init-blog.markdown檔案
以我的例子來說, 也就是在D:\kenny_blog\octopress\source\_posts裡面
使用 rake new_post語法的時候, 不能使用中文來當標題, 會發生錯誤. 你可以先用英文創建, 然後再進去檔案裡面修改你要的標題即可
編輯完檔案, 執行
rake generate
octopress就會開始作處理, 並且把相對應的修改部份轉換到_deploy資料夾
接著, 可以執行preview
rake preview
這樣octopress會開出一個localhost:4000的來給你預覽
最後, 作deploy
rake deploy
將_deploy底下的靜態網頁同步到github上面
如此, 我們直接可以開瀏覽器, 輸入http://kennytu.github.io作線上瀏覽了
最後, 最重要的步驟, 就是將你在source branch修改的部分也同步到github上面
git add . (如果有新的檔案)
git commit .
git push origin source
OK, 完成
本篇的安裝經驗到這邊, 謝謝大家 ( ̄︶ ̄)>